

Visual storytelling is all about standing out—and one way to make your presentations more visually engaging is by cropping images into custom shapes. PowerPoint offers a simple yet powerful feature known as Shape Masks, which lets you crop any image into almost any shape you can imagine.
In this blog, we’ll guide you step-by-step on how to use Shape Masks to create eye-catching visuals with a professional finish.
What Are Shape Masks in PowerPoint?
Shape masks refer to the ability to crop an image into a specific shape using PowerPoint’s “Crop to Shape” feature. Instead of sticking to plain rectangles or squares, you can display images in circles, triangles, arrows, stars, and dozens of other forms.

Powerpoint Services
This technique is perfect for:
- Profile pictures in team slides
- Image-based icons
- Creative section headers
- Custom visual storytelling
Shape masks are especially useful in marketing and branding presentations. When presenting client stories or showcasing product photos, using shape-masked images can instantly make your deck look customized and on-brand. This technique is also useful for educators creating visually-rich e-learning materials or entrepreneurs pitching creative ideas.
How to Crop Images into Shapes in PowerPoint
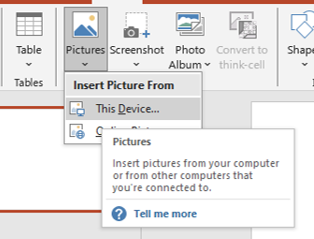
Step 1: Insert Your Image
- Go to the Insert tab
- Click Pictures and choose an image from your device or online sources
Step 2: Select the Image
Click on the image you want to crop. This will activate the Picture Format tab.
Step 3: Crop to Shape
- Go to Picture Format > Crop > Crop to Shape
- Choose a shape from the dropdown menu (e.g., circle, oval, triangle, heart)
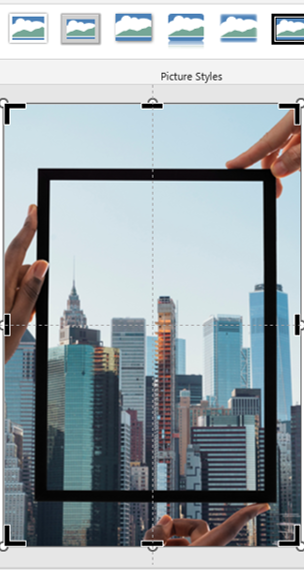
crop
Your image will instantly be cropped into that shape.
Step 4: Adjust the Crop
Want to fine-tune the position?
- Click Crop > Crop again
- Drag the handles to adjust the portion of the image shown inside the shape
If your image appears stretched or distorted after cropping, try resizing the shape first before applying the mask. Also, use PowerPoint’s “Aspect Ratio” settings (found under Crop options) to maintain a proportional crop that doesn’t affect image quality.
Using Shape Masks Creatively
📸 Create Photo Collages
Use circles or hexagons to crop multiple images and align them into a stylish collage on your slide.
🎓 Add Personality to Team Slides
Instead of standard square photos, crop team member images into custom shapes to create a modern, branded look.
✨ Highlight Key Content
Place cropped images into arrows or star shapes to draw attention to key points or statistics.
🔹 Design Unique Callouts
Use shape masks on icons or images within callout shapes to make quotations and facts more engaging.
You can even combine Shape Masks with PowerPoint animations to create interactive visual effects. For instance, cropped images can be animated using “Zoom” or “Grow/Shrink” to introduce team members one by one or highlight data points gradually during a presentation. Looking for visual inspiration? Explore our free PowerPoint template library where many templates feature creative image crops and masked graphics.
Tips for Best Results
- Use high-resolution images to avoid pixelation when cropped
- Choose shapes that match your design theme
- Pair cropped images with clean text to avoid clutter
- Stick to a consistent shape style across slides for visual unity
To enhance the visual impact, consider adding a soft shadow or subtle border to your shape-masked images. This helps them pop out of the background without appearing overdone. Also, grouping your image with text or icons ensures that design elements stay aligned while resizing or moving objects on the slide.
For extra polish, try overlaying semi-transparent shapes or icons on top of your masked images—this creates a sophisticated layered look.
Final Thoughts
Using shape masks in PowerPoint is an easy yet powerful way to transform ordinary images into standout visuals. Whether you’re aiming for a sleek, modern layout or something more playful and creative, cropping images into shapes adds a professional touch with minimal effort.
🚀 Start experimenting with Shape Masks and bring your presentations to life with custom-shaped visuals!
Want more PowerPoint tricks like this? Check out our blog on Using Merge Shapes for Custom Designs and explore more beginner-friendly tutorials at SlideMasterz PowerPoint Blogs. From image cropping to advanced infographic design, we’ve got you covered.


