

Adding animations to your PowerPoint slides can make your presentation more engaging and visually appealing. While PowerPoint offers built-in animation options, custom animations allow you to have complete control over the movement, timing, and effects. This step-by-step guide will walk you through the process of creating custom animations in PowerPoint.
Why Use Custom Animations?
✅ Enhances Engagement – Keeps your audience focused and interested.
✅ Improves Information Flow – Helps control how and when content appears.
✅ Adds a Professional Touch – Makes your presentation visually appealing.
✅ Reinforces Key Points – Directs attention to important information.
For business presentations, animations can be particularly effective in data storytelling. You can reveal charts one by one to narrate insights clearly, avoiding overwhelming your audience with too much information at once.
Step 1: Access the Animation Pane
1️⃣ Open your PowerPoint presentation and navigate to the slide you want to animate.
2️⃣ Click on the Animations tab in the PowerPoint ribbon.
3️⃣ Select Animation Pane from the toolbar to open the sidebar, which lets you manage and customize animations.
If you’re using Microsoft 365 or PowerPoint 2021, you’ll also see enhanced animation features like Morph and Zoom transitions, which can further enrich your slide experience.
Step 2: Apply an Animation Effect
1️⃣ Select the object (text, image, shape, etc.) you want to animate.
2️⃣ In the Animations tab, choose an animation effect from the available categories:
- Entrance Effects (e.g., Fade, Fly In, Zoom) – Makes objects appear.
- Emphasis Effects (e.g., Spin, Pulse, Grow/Shrink) – Highlights objects.
- Exit Effects (e.g., Disappear, Fade Out) – Makes objects disappear.
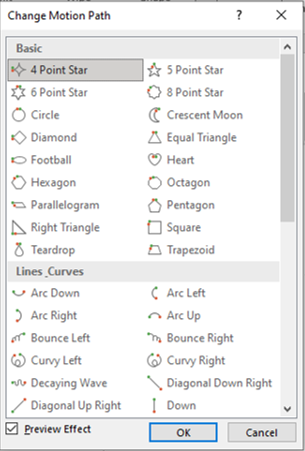
- Motion Paths (e.g., Custom Path, Arc, Line) – Moves objects along a specific route. 3️⃣ Once selected, the animation effect will be added to the object.
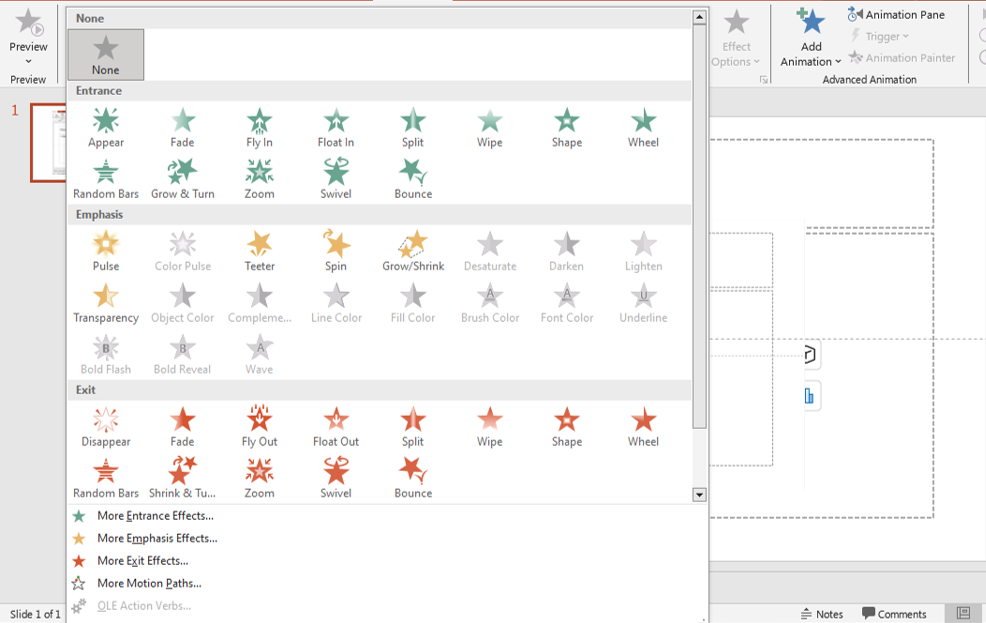
📌 Pro Tip: Use subtle animations to maintain professionalism—avoid excessive effects.
You can also explore third-party PowerPoint templates with built-in animation presets, like those available at SlideMasterz PowerPoint Templates Free Downloads, which help you save time while maintaining creativity.
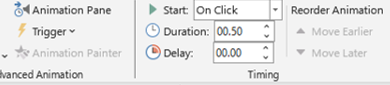
Step 3: Customize Animation Timing and Order
1️⃣ In the Animation Pane, select the animation you want to modify.
2️⃣ Click the Drop-down Arrow next to the animation and select Effect Options to adjust properties such as direction, duration, and delay.
3️⃣ Adjust the animation sequence by dragging animations up or down in the Animation Pane.

animations
For precise control, use the “Timing” tab in Effect Options. Here, you can fine-tune the start, duration, and delay settings in seconds to synchronize perfectly with your speech.
Step 4: Use Multiple Animations for Advanced Effects
1️⃣ Select an object and apply the first animation.
2️⃣ To add another effect, click Add Animation instead of replacing the existing effect.
3️⃣ Combine entrance, emphasis, exit, and motion path animations for dynamic movement.
4️⃣ Adjust the order in the Animation Pane to control when each animation plays.
📌 Pro Tip: Use With Previous, After Previous, or On Click settings to control how animations trigger.
You can also animate grouped objects for synchronized movement. Just group your shapes or text (Ctrl + G) and apply a single animation to the entire group for cleaner transitions.
Step 5: Preview and Fine-Tune Animations
1️⃣ Click Preview in the Animations tab to see how your animations play.
2️⃣ Make adjustments to timing, order, and effect options if needed.
3️⃣ Test your animations in Slide Show Mode to ensure smooth transitions.
Use keyboard shortcuts like Shift + F5 to preview from the current slide quickly—ideal when testing animation adjustments on specific slides.
Best Practices for Using Custom Animations
✔️ Keep It Simple – Too many animations can be distracting.
✔️ Use Consistently – Stick to a few animation types for a polished look.
✔️ Control Timing – Ensure animations don’t play too fast or too slow.
✔️ Match the Content – Use animations that enhance your message, not overpower it.
Try using animation sparingly in data-heavy slides. Use it to reveal rather than decorate—this approach improves clarity and focus.
Final Thoughts
Custom animations in PowerPoint help create engaging, professional, and dynamic presentations. By following these steps, you can bring your slides to life and keep your audience captivated.
🚀 Try adding custom animations in your next PowerPoint presentation and see the difference!
Looking to automate your animations or explore professionally animated templates? Visit our PowerPoint Blogs for expert tips, downloadable resources, and creative inspiration to level up your slides.


