PowerPoint slide transitions are one of the simplest yet most powerful tools for enhancing your presentation’s visual flow. When used correctly, transitions make your slides feel polished, intentional, and professional. But when they are overused—or misused—they can distract your audience and weaken your message.
In this complete beginner-friendly guide, you will learn how to use transitions effectively, customize them like a pro, and choose the right style for your presentation type.
This tutorial is ideal for students, teachers, business professionals, freelancers, and anyone wanting to elevate their PowerPoint skills.
Why Slide Transitions Matter
Slide transitions are the animations that occur between slides. They determine how one slide moves off the screen and how the next slide appears.
When transitions are used with purpose, they help:
- Maintain viewer attention
- Guide narrative flow
- Add personality and style
- Prevent abrupt cuts between slides
- Enhance storytelling
But remember: Less is more. The goal is smoothness—not distraction.
How to Apply a Slide Transition
Applying transitions is incredibly simple.
Step-by-step:
- Select the slide you want to apply a transition to.
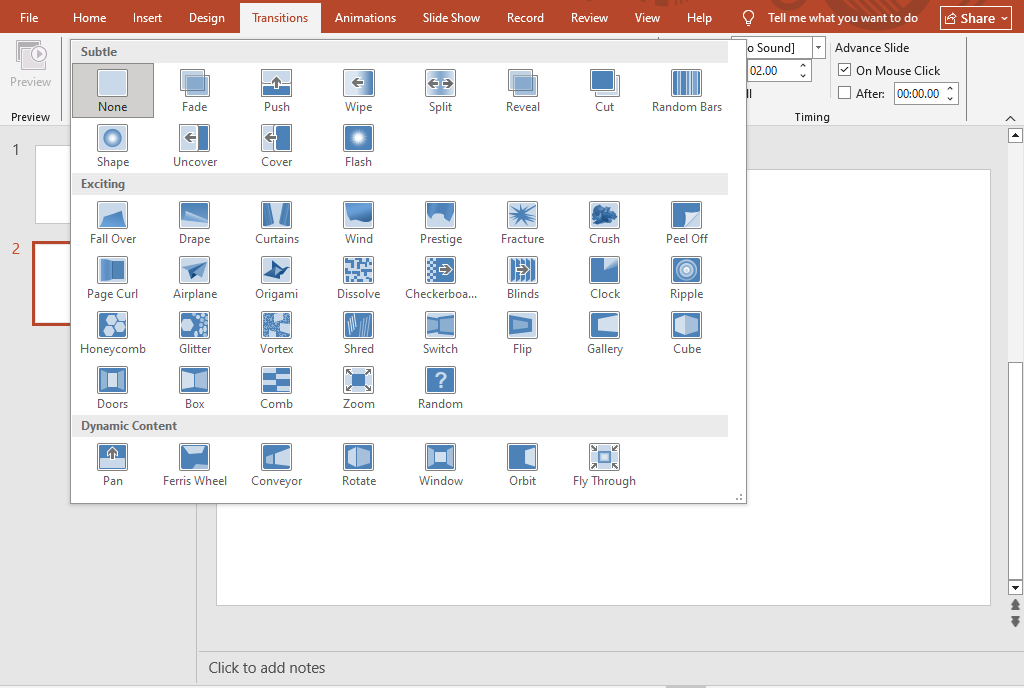
- Go to the Transitions tab in PowerPoint’s ribbon.
- Choose a transition category (e.g., Subtle, Exciting, Dynamic Content).
- Click on a transition style.
- Preview it using the Preview button.
You’ve now added a transition to the selected slide.
Types of PowerPoint Transitions (and When to Use Them)
Not all transitions are equal. Here’s how to choose the right one.
- Subtle Transitions — Best for Professional Presentations
These include: Fade, Push, Wipe, Cut.
Use them for:
- Corporate presentations
- Business reports
- Investor pitch decks
- Lectures and academic slides
Fade and Cut are the most widely used transitions among professionals.
- Exciting Transitions — Use Sparingly
These include: Gallery, Cube, Flip, Doors.
Suitable for:
- Creative presentations
- Informal sessions
- School or college projects
- Events and celebrations
They add personality but can feel unprofessional if overused.
- Dynamic Content Transitions — Great for Text-Heavy Slides
These include: Pan, Ferris, Conveyor.
These transitions animate only the content placeholders, making them perfect for:
- Comparison slides
- Infographics
- Process diagrams
They create smooth visual flow without moving the entire slide.

Customizing Transitions: Duration, Direction & Sound
PowerPoint allows full customization of transitions to match your presentation style.
- Duration
Increase or decrease how fast the transition plays.
- Fast: 0.2–0.6 seconds (business-friendly)
- Medium: 0.7–1.0 seconds (creative)
- Slow: 1.5+ seconds (ceremonial or emotional moments)
- Effect Options
Change the transition’s direction, angle, or pattern.
For example:
- Wipe → from left, right, top, bottom
- Push → from any direction
- Split → horizontally or vertically
- Sound Effects (Use With Caution)
PowerPoint includes built‑in sound effects, but adding sound to every slide can feel unpolished.
Use sounds only when:
- Presenting to children
- Creating a fun or themed slideshow
- Adding emphasis to a key moment
How to Remove or Replace Transitions
If you change your mind, transitions are easy to remove.
To remove:
- Select the slide.
- Go to Transitions.
- Click None.
This resets the slide to a clean cut.
Apply Transitions to All Slides
For consistent flow, you may want the same transition throughout.
Steps:
- Choose a transition
- Click Apply to All
Great for minimal corporate presentations.
Using Transitions in Slide Show Mode
Always preview your transitions in full-screen mode.
Go to Slide Show → From Beginning.
This helps you check:
- Timing
- Smoothness
- Audience experience
- Any distractions
Pro Tips for Using Transitions Like a Designer
To elevate your presentation:
✔ Use one or two transition styles maximum
Using too many creates chaos.
✔ “Fade” is the safest professional transition
It works for nearly every slide.
✔ Use transitions to reinforce storytelling
For example:
- Fade → conversational flow
- Push/ Wipe → process or step-by-step slides
- Split→ reveal moments
✔ Match transition style with audience type
- Executives → Subtle
- Students → Dynamic
- Events → Creative
Practice with Templates to Learn Faster
If you want to see how balanced transitions look in real-world slides, explore:
⭐ Free Templates
https://slidemasterz.com/powerpoint-templates-free-downloads/
⭐ Premium Templates
https://slidemasterz.com/premium-powerpoint-templates-for-business-education-creatives/
Our templates are designed with clean transitions that help beginners learn professional flow quickly.
Internal Resource Links for Continued Learning
Here are helpful blogs your readers may enjoy:
- PowerPoint Backgrounds: How to Choose and Customize Them
https://slidemasterz.com/powerpoint-backgrounds-how-to-choose-and-customize-them/ - Working with Icons in PowerPoint: Simple Tricks for Better Visuals
https://slidemasterz.com/working-with-icons-in-powerpoint-simple-tricks-for-better-visuals/ - Using Grids and Guides in PowerPoint for Perfect Alignment
https://slidemasterz.com/using-grids-and-guides-in-powerpoint-for-perfect-alignment/
Outbound Resource Link
For deeper learning, Microsoft’s official guide on transitions is helpful:


