

PowerPoint’s Merge Shapes tool is a hidden gem for anyone who wants to create custom graphics and layouts without needing professional design software. With just a few clicks, you can combine, subtract, and modify shapes to create unique visuals that enhance your presentations.
In this guide, we’ll walk you through how to use the Merge Shapes tool and offer creative ways to apply it to your slide designs.
What is the Merge Shapes Tool?
The Merge Shapes tool allows you to combine two or more shapes in five different ways to create custom visuals. It’s located in the Shape Format tab when you select two or more overlapping shapes.
The five merge options are:
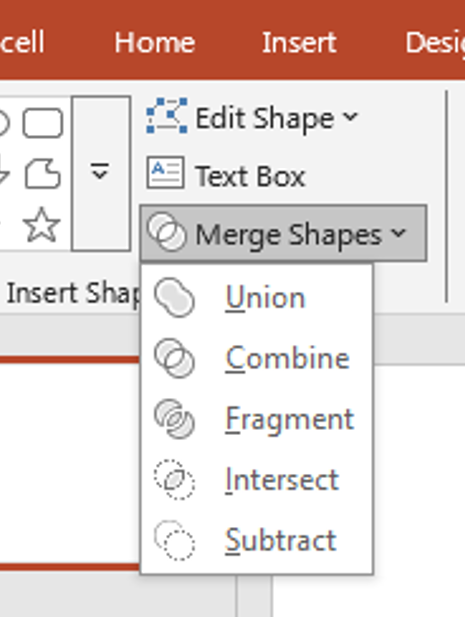
- Union – Combines all selected shapes into one.
- Combine – Removes overlapping areas and leaves a single outline.
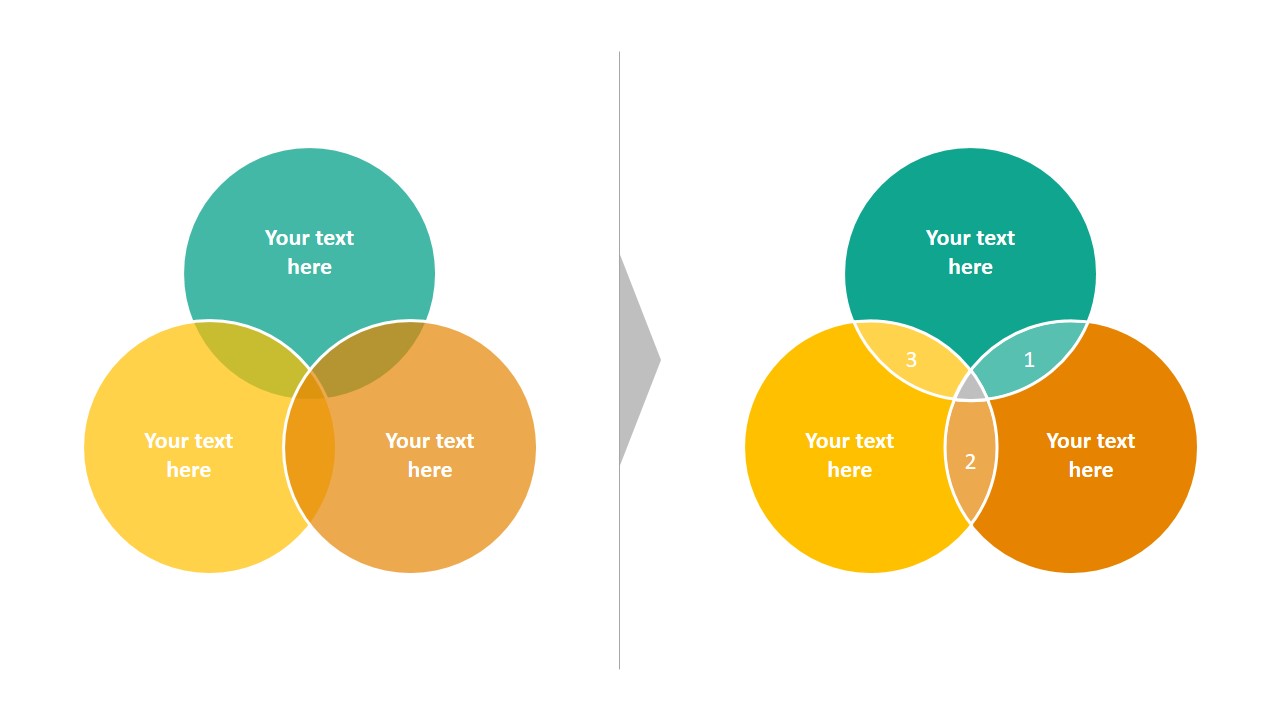
- Fragment – Breaks the shapes into individual pieces based on overlaps.
- Intersect – Keeps only the overlapping portion of the shapes.
- Subtract – Removes the area of one shape from another.
These functions give you control over how shapes interact visually, allowing you to cut, blend, and repurpose parts of multiple shapes into a new form. Whether you need a sleek logo, a custom layout box, or a stylized visual element, the Merge Shapes tool saves time and eliminates the need for external software like Adobe Illustrator.
How to Use Merge Shapes in PowerPoint
Step 1: Insert Shapes
- Go to the Insert tab.
- Click Shapes and choose the shapes you want to use.
- Draw them on your slide and position them so they overlap.
Use geometric shapes such as rectangles, ellipses, and triangles as your base. Play with transparency and sizing while placing them—this helps when you’re exploring visual compositions before merging.
Step 2: Select the Shapes
- Hold Shift and click on each shape to select multiple.
Make sure the shapes are properly layered. The first shape you click becomes the base shape for subtraction or intersection, so plan the sequence carefully.
Step 3: Access Merge Shapes
- Go to the Shape Format tab.
- Click the Merge Shapes dropdown.
- Choose your desired merge option.
Experiment with each option. For example, try Fragment first to break down a visual and then use Combine on selected fragments for a cleaner custom design. This layered approach leads to more polished results.
powerpoint fragmentation
Creative Ways to Use Merge Shapes
🌟 Create Unique Icons
Instead of relying on stock icons, use simple shapes like circles, triangles, and squares to build your own. Merge and subtract to create meaningful graphics that match your brand. This approach is especially helpful when designing pitch decks or company-specific visuals where branding consistency is key. Once created, save your custom icon as a Picture (PNG) for reuse.

Icons
🔹 Design Custom Image Frames
Place a shape over an image, subtract it from another shape, and use it as a creative frame. This adds visual interest to photo-based slides. Try this with rounded rectangles or stars to give a non-traditional shape to your photo placeholders. It’s an easy way to elevate slide aesthetics without heavy editing.
► Make Abstract Backgrounds
Use the Fragment tool with overlapping shapes to create geometric patterns and abstract backgrounds. Fill the fragments with gradients for a modern design. Layer shapes with semi-transparent fills to add dimension. These patterns can serve as subtle backdrops, helping your main content stand out while making the slide visually engaging.
timeline
🏛️ Build Custom Infographics
Create data visuals like pie charts, bars, and process diagrams using merged shapes that are styled uniquely for your content. Instead of traditional charts, use shape merging to create icons for each step in a process or to segment data visually. It offers a more personalized and branded infographic style.
🎓 Highlight Key Content
Design custom highlight boxes or arrows to draw attention to important information using Intersect or Subtract tools. These custom callouts help guide your viewer’s eye exactly where you want it. Try pairing them with subtle animations to emphasize key slides in training or client presentations.
Tips for Best Results
- Layer smartly: The order in which shapes are selected matters. The first shape you click will remain as the base.
- Use consistent colors: After merging, reapply fills and outlines to maintain a unified look.
- Group elements: Once you finish a design, group it to keep it intact while moving or resizing.
- Experiment: Don’t be afraid to try different combinations—the best designs often come from trial and error.
Also, consider saving frequently used custom shapes in a reusable slide master or template to maintain consistency across projects. This saves time and promotes design uniformity throughout your presentation deck.
Final Thoughts
With the Merge Shapes tool, PowerPoint becomes a flexible design platform where your creativity can shine. Whether you’re building custom layouts, icons, or infographics, merging shapes allows you to move beyond the basics and design like a pro. Instead of relying on third-party graphics or downloading templates, mastering this one tool lets you craft slides that feel unique, on-brand, and highly professional. It empowers you to tell your story visually—exactly the way you envision it.
✨ Start experimenting with Merge Shapes and turn your next presentation into a visual masterpiece.


