
 (1)")
When building a slide deck, most beginners focus on colors, fonts, and images — but overlook one of the most important factors of professional presentation design: alignment. Even the most beautiful slide can look unpolished if objects are not properly aligned.
Fortunately, PowerPoint offers a suite of powerful alignment tools that can instantly transform your slides from messy to clean, from amateur to professional. Whether you’re creating a business proposal, pitch deck, academic presentation, or a simple team report, mastering alignment tools is essential for clean visual communication.
Let’s break down how to use PowerPoint’s alignment features like a pro — step-by-step.
⭐ Why Alignment Matters More Than You Think
Alignment ensures your slide elements are placed in a visually organized manner. When objects align well, the viewer:
- Understands information faster
- Feels the design is more reliable and polished
- Experiences less visual strain
- Trusts the message more
Professional presentations are not just about content — they’re about clarity. Alignment is the backbone of clarity.
🔧 Step 1: Selecting Objects Correctly
Before using alignment tools, you must select your objects. You can choose multiple objects by:
- Pressing Ctrl + Click on each object
- Dragging your mouse to draw a selection box
- Using Ctrl + A to select all objects on the slide
Once selected, PowerPoint automatically shows alignment options under Shape Format or Picture Format.
🎯 Step 2: Using the Basic Alignment Tools
PowerPoint offers six core alignment options:
- Align Left
- Align Center
- Align Right
- Align Top
- Align Middle
- Align Bottom
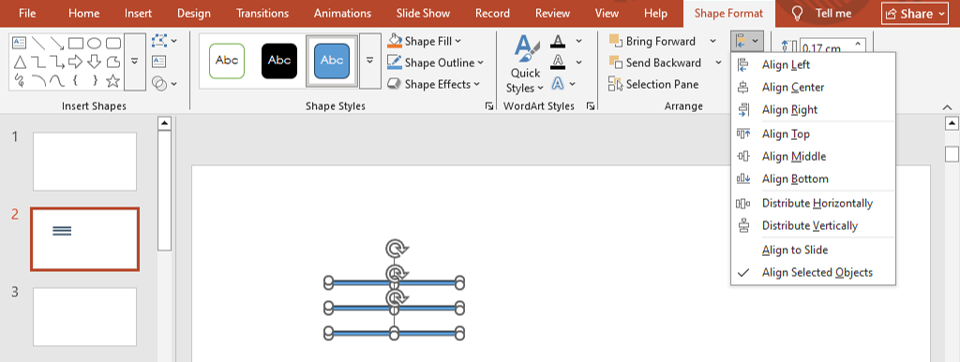
To use them:
- Select two or more objects
- Go to the Home tab
- Click Arrange → Align
- Choose your desired alignment
When to use which?
- Align Left: For text-heavy slides and structured layouts
- Align Center: Ideal for titles, big images, or posters
- Align Top/Bottom: For building visually consistent rows
- Align Middle: Great for icons and labels
🔥 Step 3: Distribute Objects for Even Spacing
Your objects might be aligned, but spacing them evenly is just as important.
To evenly distribute:
- Select all the objects
- Go to Arrange → Align
- Choose:
- Distribute Horizontally
- Distribute Vertically
Use this when you have:
- A row of icons
- Bullet replacements
- Infographic elements
- Comparison slide columns
It instantly gives your slide that premium, grid-based look.
📏 Step 4: Use Smart Guides for Real-Time Assistance
Smart Guides are the pink dotted lines that appear when you move objects around. These help you align objects relative to each other by showing:
- Perfect center alignment
- Equal distance gaps
- Horizontal/vertical matching
Smart Guides work automatically — no setup required.
🧭 Step 5: Combine Alignment Tools with Grids & Guides
For more precision, turn on:
- Gridlines
- Guides
- Rulers
Go to View → Show → Check all boxes
Using these gives you a layout similar to professional design tools like Figma or Illustrator.
(You can also read our detailed guide on grids here:
Using Grids and Guides in PowerPoint for Perfect Alignment
https://slidemasterz.com/using-grids-and-guides-in-powerpoint-for-perfect-alignment/)
🧠 Step 6: Use the “Align to Slide” Feature
If you want an object to align to the slide itself (not to other elements):
- Select object(s)
- Go to Align
- Choose Align to Slide
This is ideal for:
- Centering titles
- Making symmetrical layouts
- Ensuring balanced backgrounds
🎨 Step 7: Alignment in Slide Master for Consistent Branding
Using the Slide Master ensures your alignment stays consistent across all slides — perfect for businesses and creators.
You can align:
- Logos
- Headers
- Footers
- Text placeholders
- Image frames
To learn Slide Master in depth, check this guide:
https://slidemasterz.com/using-powerpoints-slide-master-for-consistent-and-professional-designs/
⭐ Speed Up Your Workflow with Keyboard Shortcuts
PowerPoint doesn’t offer direct alignment shortcuts, but here’s a fast workflow:
- Alt → H → G → A opens the alignment menu
- Then press:
- L for Align Left
- C for Align Center
- R for Align Right
- T for Align Top
- M for Align Middle
- B for Align Bottom
Try this once — you’ll never go back!
🎁 Bonus Tip: Use Ready-Made Templates with Perfect Alignment
Designing from scratch is great — but not always efficient.
Our templates at SlideMasterz are built with:
- Pixel-perfect alignment
- Balanced grids
- Professional spacing
- Modern design systems
Explore premium templates here:
👉 https://slidemasterz.com/premium-powerpoint-templates-for-business-education-creatives/
Or start with our free templates:
👉 https://slidemasterz.com/powerpoint-templates-free-downloads/
Studying professional templates is one of the fastest ways to learn layout and alignment.
🔗 Helpful Related Blogs
- PowerPoint Backgrounds: How to Choose and Customize Them
https://slidemasterz.com/powerpoint-backgrounds-how-to-choose-and-customize-them/ - Mastering PowerPoint Shapes: A Beginner’s Guide
https://slidemasterz.com/mastering-powerpoint-shapes-a-beginners-guide/ - How to Insert and Format Shapes in PowerPoint (Step-by-Step)
https://slidemasterz.com/how-to-insert-and-format-shapes-in-powerpoint-step-by-step/


