
")
Shapes in PowerPoint aren’t just decorative — they’re powerful tools for designing layouts, highlighting key points, and making your slides visually engaging. From arrows and circles to custom icons and infographics, shapes allow you to turn a plain presentation into something memorable.
In this step-by-step guide, you’ll learn how to insert and format shapes in PowerPoint, along with practical tips to make them look professional.
Why Use Shapes in PowerPoint?
Shapes serve multiple purposes beyond simple visuals:
- Highlighting Information – Draw attention to specific text or data.
- Organizing Content – Use shapes for boxes, grids, and dividers.
- Creating Infographics – Combine multiple shapes to illustrate processes.
- Designing Custom Layouts – Go beyond templates and make slides your own.
- Building Icons – With the Merge Shapes tool, you can create custom icons.
👉 Related: Learn more in our guide on creative ways to use shapes for visual storytelling.
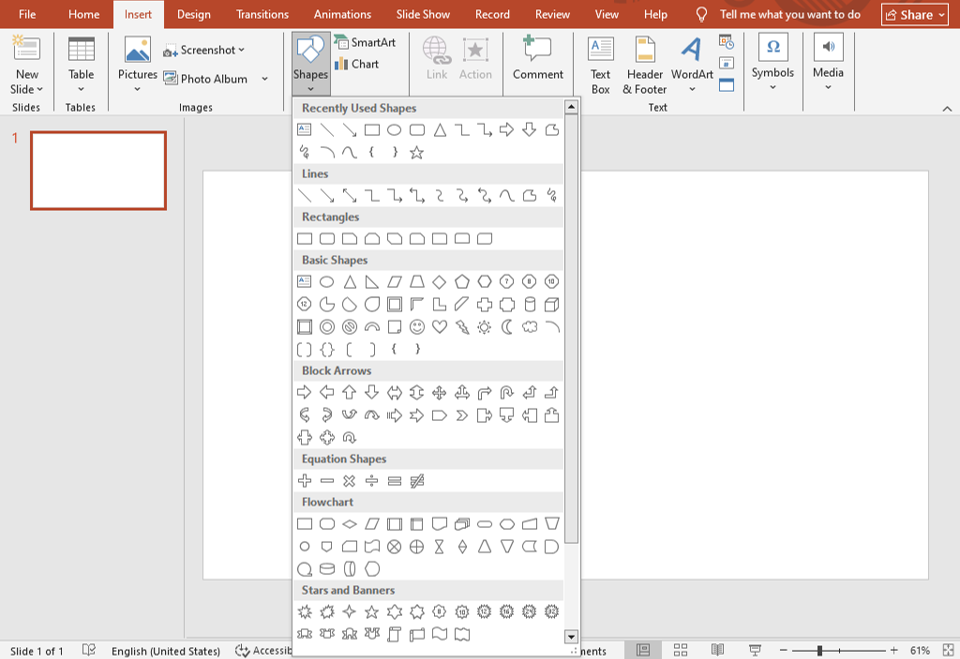
Step 1: How to Insert Shapes
Adding shapes is quick and easy:
- Go to the Insert tab on the ribbon.
- Click on Shapes.
- Choose from categories like rectangles, circles, arrows, stars, or callouts.
- Click and drag on your slide to draw the shape.
That’s it! You’ve added your first shape.
Step 2: Basic Shape Formatting
Once a shape is added, PowerPoint automatically opens the Shape Format tab. Here’s what you can do:
- Fill Color: Choose solid, gradient, or picture fills.
- Outline: Adjust thickness, style, or remove the outline completely.
- Shape Effects: Add shadows, reflections, or glow effects.
- Size & Position: Resize, rotate, or align shapes perfectly.
👉 Pro Tip: Use the Align tool (found under the Format tab) to distribute multiple shapes evenly for cleaner designs.
Step 3: Advanced Formatting Options
- Shape Styles
PowerPoint comes with pre-set styles that apply coordinated fills, outlines, and effects with one click.
- Gradient & Texture Fills
- Gradients add depth and modern design flair.
- Textures mimic paper, wood, or fabric for unique looks.
- Picture Fills
Turn any shape into a frame for an image. For example, crop a headshot into a circle or a product photo into a hexagon.
👉 Related: See our tutorial on shape masks in PowerPoint.
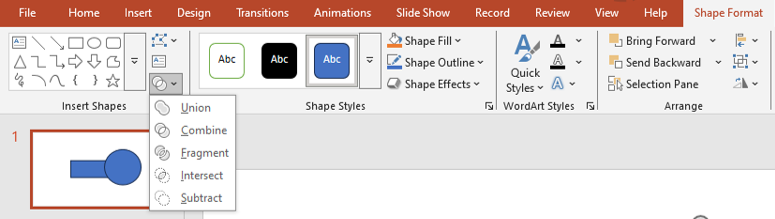
Step 4: Combining Shapes for Custom Designs
One of PowerPoint’s most underrated features is the Merge Shapes tool (found under the Shape Format tab). With it, you can:
- Union – Merge two shapes into one.
- Combine – Create cutout effects.
- Intersect – Keep only overlapping parts.
- Subtract – Cut one shape out of another.
This is perfect for building icons, logos, or unique infographics.
Step 5: Adding Text Inside Shapes
You can also turn shapes into text containers:
- Right-click the shape.
- Select Add Text.
- Format the text with fonts, sizes, and alignment.
This works well for callouts, flowcharts, or labeling parts of a diagram.
Best Practices for Using Shapes
- Stay Consistent: Use the same style of shapes throughout your presentation.
- Less Is More: Don’t overcrowd slides with too many shapes.
- Match Branding: Use your company’s colors and fonts for professional results.
- Think Hierarchy: Use larger shapes for main ideas and smaller ones for details.
Common Mistakes to Avoid
- Overusing flashy effects like shadows and glows.
- Using too many different shapes on one slide.
- Ignoring alignment, which makes slides look messy.
- Forgetting to test readability when adding text inside shapes.
Free Templates to Practice
Want to practice without starting from scratch? Download our Free PowerPoint Templates, many of which include pre-designed shapes, layouts, and infographics.
Premium Templates for Professionals
If you’re looking to save time and still impress your audience, explore our Premium PowerPoint Templates.
They include:
- Custom-designed shape layouts.
- Editable infographics built entirely from shapes.
- Ready-to-use branded slide designs.
Final Thoughts
Shapes are one of the most versatile tools in PowerPoint. From simple highlights to advanced custom designs, they help you create slides that are clear, professional, and engaging.
By mastering shapes, you can transform ordinary slides into compelling visuals — without needing graphic design software.
👉 Next, check out our guide on creating infographics with PowerPoint shapes to take your skills to the next level.


